Cutting Plaster Is A Common Task In Old House Remodeling


In This Article:
An existing stud is removed from a plaster-and-lath wall, a rectangular hole is laid out, the wood lath is cut away and the final hole is cut in the wallboard.
|
Related Articles:
|
Starting Point:

I cut this 8-inch-square hole about two years earlier.
While remodeling the first-floor rooms below, we ran a 6-3G cable from the basement up to this second-floor hallway. By cutting a large hole I was able to reach into the wall cavity and grab the cable while the homeowner pushed the cable from below.
Sub-Panel Location:
After removing the plaster and lath from the old apartment kitchen, the access hole (red arrow) could be seen from behind.
The 6-3G sub-feed cable can be seen coiled up just below the hole.


A Problem:
The spacing between the old studs was only about 14 inches, and the new panel requires almost 14-1/2 inches.
We removed the stud near the door opening.


To compensate for the reduced structure, we added another stud to the double-studs at the door opening.
Also, since the old studs were wider than new studs (almost 3-7/8" wide) we added a layer of 3/8" plywood to the new triple-stud, and all the other new 2x4 framing that had to align with the old framing.
The location of the old stud is visible as a whitish streak on the wood lath.


Cutting short lath boards can be tricky. The boards will wiggle and vibrate and cause the plaster to crack.
To keep the lath from moving, We clamped a piece of 1x3 lumber to the back side of the wall. This board was rather curved, and we placed the "crown" toward the wall. This held better than a straight board.
We started cutting like it was a plunge cut. Our goal was to only cut through the lath.
We used a short wood-cutting blade. A long blade is sometimes better for starting plunge cuts because it can be held at a lower angle against the wall. But long blades also flop around a lot while starting the cut.
Other Plaster Cutting Methods:
Typically I'll use a carbide-coated plaster-cutting blade to cut both plaster and wood lath at the same time. However, a plaster-cutting blade cuts really slow through wood.
Normally, once the blade breaks through the wall surface I will rest the foot of the reciprocating saw against the lath, to minimize the amount of flexing of the lath.
The wall in these photos had a layer of paneling over the plaster, and then a layer of ½" drywall. (The previous remodeler was too cheap or too lazy to simply yank the paneling from the walls before adding drywall.) Consequently, cutting with a plaster blade was painfully slow.
The other side of the opening needed to be flush with the stud.
For this cut we used a long wood-cutting blade... one that was kinda old and getting dull.
We started with this tricky plunge cut that was against the stud.


The key to cutting an opening that is flush with a stud is to flex the blade like this.
The blade needs to be pushed firmly against the stud, so the front part of the blade rides against the stud while the reciprocating saw moves the blade back and forth.
Of course the blade needs to be mounted upside down in the reciprocating saw, and the saw needs to be held as close to the wall as possible.
We only cut part way through the wall... just enough to cut the wood but not deep enough to engage the plaster.
Old plaster contains sand, which dulls the blade immediately.


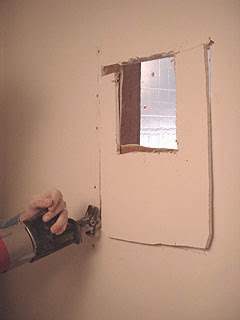
I put a carbide plaster-cutting blade in the reciprocating saw and cut out the plaster/drywall from the front side.
The completed hole.
We still needed to grind down some high spots along the edges of the hole.


To create the 14-1/2" wide opening in the framing, we fastened some blocks of wood to the nearby studs.
We mounted the new sub-panel to the framing with 1-1/4" Simpson Strong-Drive screws.
But... we couldn't use the normal mounting holes. The plaster/lath and drywall multi-layer surface was so thick, the mounting screws would've just bit into plaster.
So we drilled four new holes farther back, so the screws would hit the wood framing.

No comments:
Post a Comment