 | Lighting:
Installing A Flush-Mount
Ceiling Light Fixture
|
| In This Article:The mounting strap and threaded tube are set to the proper height and installed. Electrical connections are made and the fixture base is secured to the mounting strap. Light bulbs and glass dome are installed. | Related Articles:
|
| Skill Level: 2 (Basic) | Time Taken: About 30 Minutes |
As with all electrical projects, the power must be turned off to the wires being worked on. This usually means turning off the circuit breaker. Anybody who is dumb enough to work on live wires deserves to get jolted.
I recommend a non-contact voltage tester (which looks like a fat ball-point pen) to test wires for presence of voltage.
 | My starting point: The ceiling junction box had a temporary light fixture connected by twist-on connectors (a.k.a. wire nuts) to the supply wires. |
|
| The basic 13 inch diameter close-to-ceiling flush-mount light fixture.This package cost about $20 at Menard's... for two fixtures. |  |
|
 | The most important step is to measure the height of the dome from a flat surface.My question: Why can't the manufacturer tell me this? Do they have huge variations from one unit to the next?
I measured about 5 inches. |
|
| I adjusted the mounting strap and threaded tube until the tube measured about 5 inches long, or perhaps 1/8 inch longer. |  |
|
 | I tightened the nut to lock the threaded tube in place.If this tube isn't locked from turning, when I install the final nut the tube might move. That's been a big problem with other light fixtures. |
|
| I removed the original screws from the junction box.This J-box was metal, so it came with mounting screws. Plastic junction boxes aren't usually supplied with screws. The light fixture, of course, came with screws. |  |
|
 | Small detail:The drywall surface ended up about 1/8 inch below the metal box. Not a problem, but I needed to adjust the threaded tube a little longer. |
|
| I attached the threaded tube to the junction box.I used a cordless drill-driver (actually it's an impact driver, not a drill) to drive the screws. |  |
|
 | I wrapped the ground wire around the green ground screw on the mounting strap, and tightened the screw. |
|
| I wrapped the flexible stranded light fixture wire around the ends of the supply wires, and secured them with wire nuts®. (Or twist-on wire connectors, as the trademark holder wants me to call them) |  |
|
 | The wires have been connected (ground, neutral, and hot) and the fixture is ready to be secured to the ceiling. |
|
| This washer and nut are supplied to hold the fixture to the ceiling. |  |
|
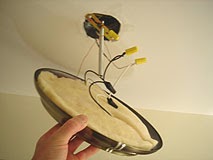
 | I held the fixture up against the ceiling with one hand and threaded the nut all the way up. |
|
| Fixture base installed. |  |
|
 | I installed the light bulbs. |
|
| I placed the globe over the threaded tube. |  |
|
 | And I installed the globe-holding threaded thing (I guess it's called a finial).The instructions show a nut being used in addition to the finial, but I didn't use it. There didn't seem to be enough room for the nut beneath the finial, and the finial presses farther away from the hole in the glass, which should reduce the chances of chipping or cracking the glass. |
|
| Mission accomplished. | |
|
 | Plenty bright for a hallway.I may switch to a pair of 40 watt bulbs later, since this is maybe too bright. I'd rather have the capacity for lots of light, than not have enough light when the fixture is used with the highest wattage bulbs allowed. |
|
Never exceed the highest wattage bulb that the manufacturer recommends. Why? There is a risk of overheating, which implies a risk of starting a fire. I have seen wires that were charred from people using higher wattage bulbs than allowed. Not good.


No comments:
Post a Comment