 | Custom Workbench:
Hot-Wiring A Work Bench:
Adding Built-In Outlets
|
| In This Article:Two metal j-boxes are attached to the underside of a wooden workbench, connected with NM-B cable, and power is fed by a short 14 gauge extension cord. | Related Articles:
- Building A Cheap (And Sturdy) Work Bench
- Index Of Electrical Articles
- Links To Other Electrical How-To Web Sites
|
| Skill Level: 2 (Basic) | Time Taken: 1 Hour |
 | This work bench held a small table saw and a belt sander. The bench sits near the middle of the garage. (A table saw needs room in front and behind, so this bench needed to be between the two garage stalls.) Power was provided by a short extension cord, and it was becoming inconvenient to continually unplug one machine to use the other. So, I decided to hot wire the work bench. |
 | I bought an 80 foot heavy-duty 14 gauge extension cord, which is capable of handling 15 amps of electrical current.
I cut the cord about 20 feet from the male end. (It goes without saying that the cord MUST BE UNPLUGGED when making the cut, right?) I've made dumber mistakes, I'll admit. |  |
 | The basic hardware required. Two smooth metal boxes, some cable clamps, metal cover plates.
The first step was to install two cable clamps in one box. (See How Cable Clamps Are Installed.) |  |
These metal junction boxes are "surface mount" boxes. They are meant to be used with conduit and bolted to a wall. They are commonly used in commercial and industrial wiring where the conduit and boxes are just mounted to a cement block wall.
 | I use hex-head sheet metal screws to mount things whenever possible.
Two short screws installed with a cordless drill hold the box securely and takes only a few seconds. Nails or screws can be used. |  |
 | A 1/2 inch drill bit is used to drill a hole in the lower shelf of the work bench.The cut end of the extension cord is threaded through the hole and into the electrical box. |  |
 | The screws on the cable clamp are tightened. (Not too much.)
These wire staples hold electrical cable in place, and they cost less than a penny apiece. |  |
 | I start by running 14-2G cable into the other receptacle box (the one that does not have the extension cord feeding power into it) and fastening the cable to the underside of the workbench. The cable is kept in the middle of the 2x4 frame, so any nails driven into the bench will not likely pierce the cable. I use plenty of wire staples. |  |
 | The wire staple is driven in just like a nail.
The cable is attached to the bench and then cut off so the cable can enter the box and extend out four to six inches beyond the box face. Better to make the cable a couple inches too long than be too short. |  |
 | The cable is anchored firmly by the cable clamp.
The outer cable insulation jacket iscarefully slit with a sharp knife. Caution is needed because the three wires inside are twisted and you cannot tell where they are, so it is possible to knick the insulation. |  |
 | The insulation jacket is trimmed back.
Similarly, the outer jacket on the 14-2G NM-B cable is slit. Two conductor NM-B cable (common household wiring) is easier to slit because the cable is a ribbon and the bare ground wire is in the middle. So, simply keeping the knife in the middle of the cable is adequate. |  |
 | The cable jackets are removed. The green insulated wire is a ground wire.
At the other box, the cable jacket is stripped and the wires are stripped. |  |
| The receptacle is connected to the wires. The bare ground wire is looped under one of the mounting screws that holds the box to the frame.
The receptacle is mounted on the box. |  |
 | Back at the other receptacle box... Three pigtails are cut.
The wires are stripped back about 1/2". |  |
 | The ground pigtail is looped under one of the mounting screws, and then connected to the other two ground wires with a green wire nut.
I always tug on each wire to ensure they are all snugly bound in the wire nut. The flexible stranded wire in extension cords sometimes does not hold well in wire nuts. |  |
 | The two white wires and the pigtail are held together.
I wrap the stranded wire around the other two, solid wires... |  |
 | ...And then a yellow (small) wire nut is twisted on. The wires often get twisted as a result.
The same thing is done for the black wires. Note the hooks on the pigtails, for connecting to the screw terminals on the outlet. |  |
 | The ground, white and black wires are connected to their respective screw terminals.
And the cover plates are installed. |  |
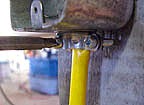
 | One last thing. A staple is installed to secure the extension cord to the frame of the work bench. Just in case the cord gets kicked it won't put much stress on the cable clamp.
The extension cord is plugged in and the outlets tested. (Of course they worked perfectly.) At this time I realized that the old extension cord had no ground prong... a safety hazard when used to supply power to woodworking machines made mostly of metal. At least that hazard is gone. |
Tools Used:
- Cordless drill
- Nut-driver bit, 1/2 " spade drill bit
- Hammer
- Sharp Knife
- Wire Cutters
- Wire Strippers
- Phillips and Flat-blade Screwdrivers
| Materials Used:
- Receptacle boxes - 2 @ $0.69
- Outlet Covers - 2 @ $0.39
- Cable Clamps - 3 @ $0.19
- 14-2G Cable - 6 feet, approximately $0.35
- 80 foot heavy duty extension cord, $14 (I used only the male end and 20 feet of wire.)
- Total - $17.08
|


No comments:
Post a Comment