Construction Housing Recessed Can Light

How to wire Recessed Lights in Kitchen
How to Install and Remove Recessed Light Trim

4 in. Miniature Line Voltage Airtight IC New Construction Housing
.jpg)
4-in Contractor Select Incandescent Remodel Housing Recessed Can Light (6-Pack)

6 in. 150W Line Voltage Universal Housing

6 in. 150W Remodel Housing with Adjustable Socket Bracket

19W 6in Dimmable LED Recessed Lighting Fixture,
170W Halogen Bulbs Equiv,
Cool White - See more at httpwww. lightingever.
comdimmable-led-recessed-lighting-fixture

Broan 744 70 CFM Recessed 75 Watt Bulb FanLight

Construction Housing Recessed Can Light

Halo H7ICAT, 6 in. Housing IC Air-Tite 120V Line Voltage Incandescent

Kitchen Soffit Lighting with Recessed Lighting
.jpg)
LE 8W 3.5-Inch LED Recessed Ceiling Lights,
75W Halogen Bulb Equivalent,
Warm White,
Recessed Light,
Downlight,
Pack of 4 Units (2)
.jpg)
LE 8W 3.5-Inch LED Recessed Ceiling Lights,
75W Halogen Bulb Equivalent,
Warm White,
Recessed Light,
Downlight,
Pack of 4 Units (3)
.jpg)
LE 8W 3.5-Inch LED Recessed Ceiling Lights,
75W Halogen Bulb Equivalent,
Warm White,
Recessed Light,
Downlight, Pack of 4 Units (4)
.jpg)
LE 8W 3.5-Inch LED Recessed Ceiling Lights,
75W Halogen Bulb Equivalent,
Warm White,
Recessed Light,
Downlight,
Pack of 4 Units (5)

LE 8W 3.5-Inch LED Recessed Ceiling Lights,
75W Halogen Bulb Equivalent,
Warm White,
Recessed Light,
Downlight,
Pack of 4 Units

Pendant Recessed Lighting

Recessed Lighting Series 6 in. IC

Velato - P195P Series
How to wire Recessed Lights in Kitchen
How to Install and Remove Recessed Light Trim
Recessed Lighting Made Easy
Recessed Lighting
Basics of LED Energy Efficient Lighting
Installing LED recessed ceiling lights
Installing Recessed Lighting- DIY Network
Lighting Design Simulation for Kitchen Lighting By Ezzat Baroudi
Step 1: Do Your Spot Checks
Use the lighting plan to mark the rough location of the can lights, making any adjustments as needed. Use a laser level to ensure that the lights are in a straight line. Poke a coat hanger through the marks to check that the lights won't fall on a joist. Check the spots up in the attic. Be sure to wear protective gear when working around insulation.
Use the lighting plan to mark the rough location of the can lights, making any adjustments as needed. Use a laser level to ensure that the lights are in a straight line. Poke a coat hanger through the marks to check that the lights won't fall on a joist. Check the spots up in the attic. Be sure to wear protective gear when working around insulation.
Step 2: Cut the Holes
Back in the kitchen, cut out the holes using a drill with a hole saw attachment. Set the scan light in place and nail it to the joists. Strip the end of the wire with a wire stripper.
Back in the kitchen, cut out the holes using a drill with a hole saw attachment. Set the scan light in place and nail it to the joists. Strip the end of the wire with a wire stripper.
Step 3: Feed Wires Through the Connector
Remove the cap from the light fixture and snap the easy connector into the light fixture. Feed both sets of wire through the connector. Insert the clip from the side and squeeze it with the pliers.

Remove the cap from the light fixture and snap the easy connector into the light fixture. Feed both sets of wire through the connector. Insert the clip from the side and squeeze it with the pliers.

Step 4: Connect the Wires
Push the ends of the wires into the wire connector. Put all the wiring back in the box and put on the cover plate. Snap the trim kits on the lights.

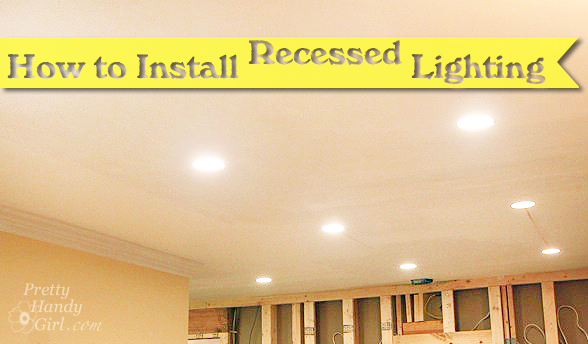
 Kitchen progress is definitely moving along (hooray!!!) We now have recessed lighting in our ceiling and it really helps even out the lighting in the kitchen. Plus getting rid of the semi-flush light fixtures makes the ceiling feel taller.
We debated about installing new construction recessed lighting:
Kitchen progress is definitely moving along (hooray!!!) We now have recessed lighting in our ceiling and it really helps even out the lighting in the kitchen. Plus getting rid of the semi-flush light fixtures makes the ceiling feel taller.
We debated about installing new construction recessed lighting:
 or remodel type recessed lights:
 We could have installed either because our ceiling was already full of holes. Ultimately, we decided to install the old work (or remodeling type) lights because they clamp tightly to the sheet rock for less vibration. They also have a built in junction box with easy to wire connectors. (Did I mention that my son’s bedroom is right over the kitchen and there is a lot of jumping and bouncing that goes on up there!)
My electrician let me pal around and help him install the recessed cans after he ran the wiring. You know I took careful notes so I could share with you how to install your own recessed lighting fixtures.
Materials:
- Remodeling recessed lights
- Light bulbs (be sure to get bulbs rated for your cans or they may blink out when the temperature gets too hot.)
- Wire coat hanger
- Pencil
- Piece of tape
- Hole saw (or drywall saw)
- Wire strippers
- Wire cutters
- Flat screwdriver
- Utility knife
- Hammer (optional)
Instructions:
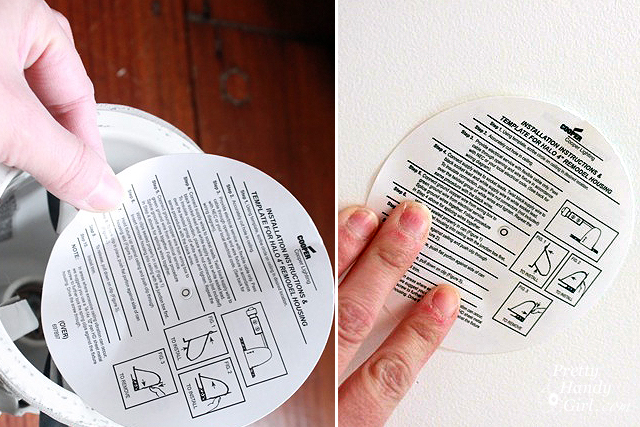
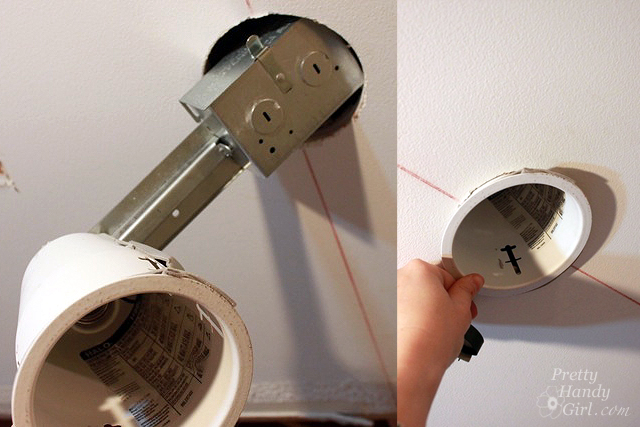
First determine where you would like your light installed. Hire an electrician to run electricity though your ceiling if there aren’t already wires accessible. Remove the paper template from the recessed can. Trace onto the ceiling with pencil.
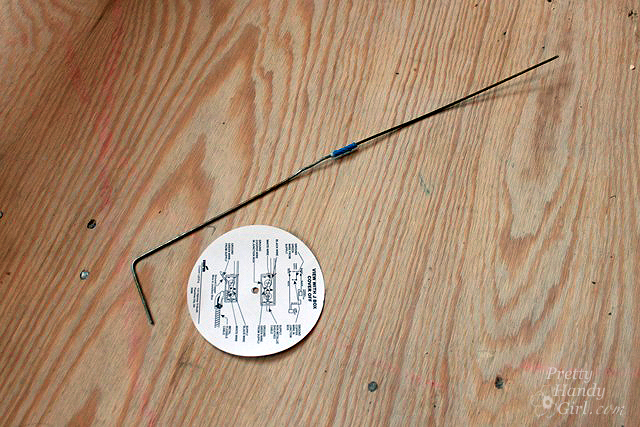
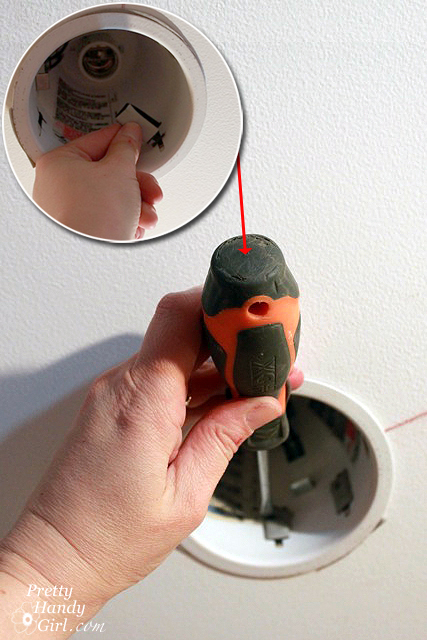
 My electrician showed me how to make this cool tool out of a coat hanger to determine if there are any obstructions in the ceiling.
 First bend the wire to the radius of the paper template (from the center to the exterior edge.) Next place the coat hanger against the side of the can. Extend the bent end an inch or so above the can and then wrap a piece of tape around the hanger where it meets the bottom of the recessed light (shown by the red line.) Here is what the tool looks like when you are done:
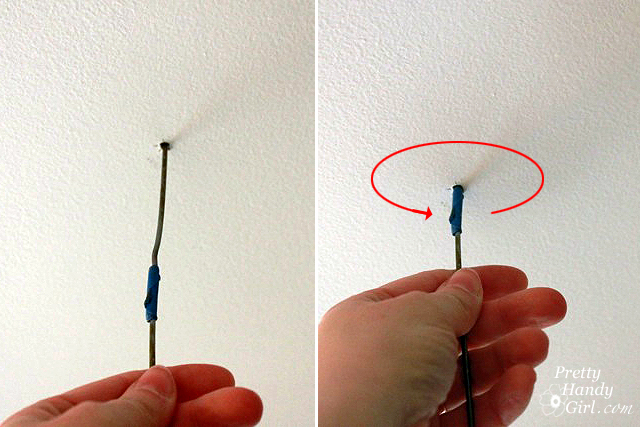
 Press the bent end up into the center of your traced circle. Then press the hanger up into the ceiling until you reach the tape. Spin the wire around. If it doesn’t hit anything you have the clearance you need to install the recessed light. If you hit something, you’ll need to relocate the light to another location.
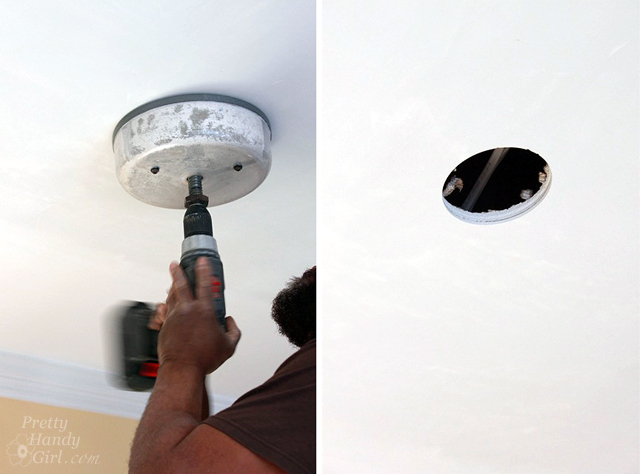
 Cut around the pencil line into your ceiling using a drywall saw. Or you can use this fancy hole cutter my electrician uses. It attaches to the drill and has a spinning blade that cuts the hole. The bowl around the blade catches all the drywall mess. Genius!
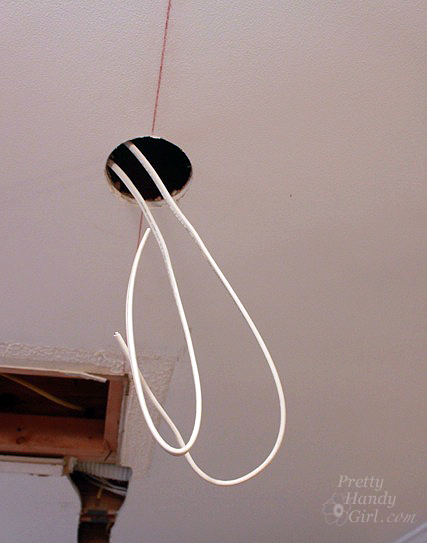
 Pull the wires that the electrician ran through the hole.
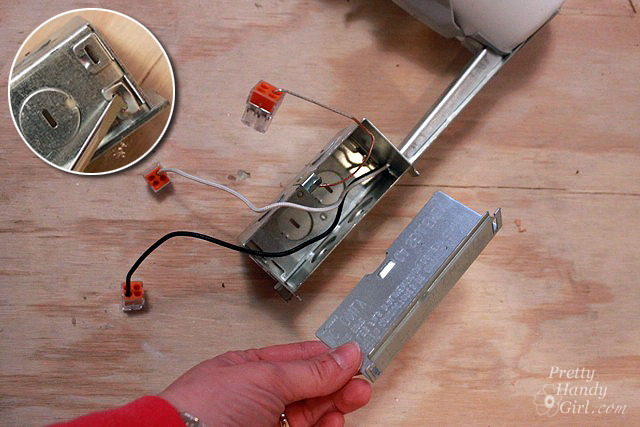
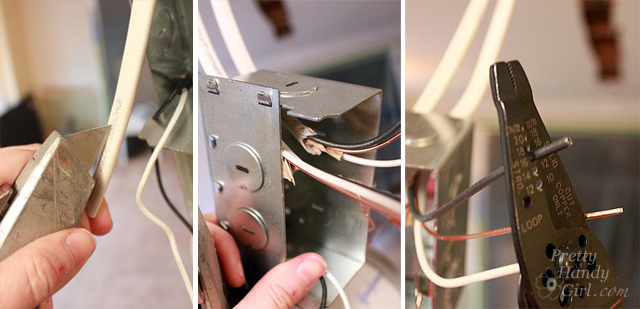
 Grab one of the recessed light fixtures. Remove the cover from the junction box. Use the flat screwdriver to break off the slot(s) in the side of the junction box. You’ll only need to break off one tab per wire. (If you have two wires, the fixture is in a daisy chain and electricity runs to another fixture from that one. In that case, break off two slots.)
 Feed the wire(s) through the slot(s) in the side of the junction box. Pull them through about 6 – 8″ to give you enough room to work with.
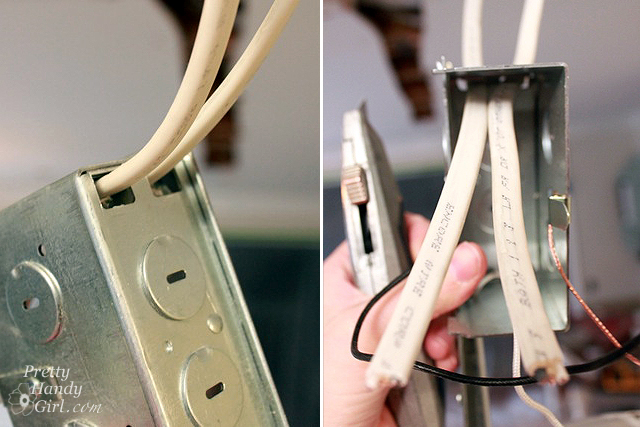
 Gently score the plastic coating of the wires. Then cut off the plastic coating and the paper coating from the wires. Finally strip off about 3/4 of an inch from the end of the black and white wires.

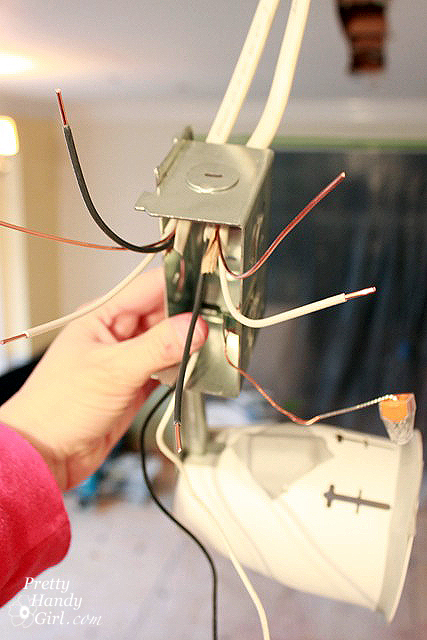
Spread out the wires in the box and locate the ones attached to the light fixture.
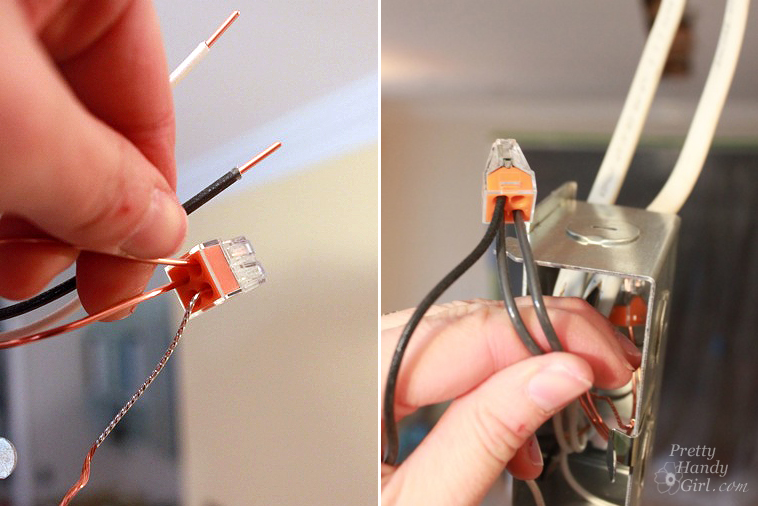
 Here comes the easy part! Attach the newly stripped wire to the same colored wire from the junction box by firmly inserting the wire into the wire connector. [White connects to white; Black to black; and bare to bare (or green).] Gently tug on the wires to make sure they won’t slip loose from the connector.
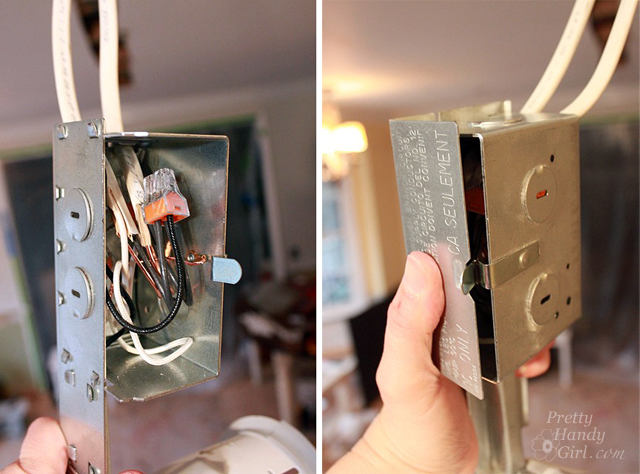
 Gently fold the wires back into the junction box, take care to keep the black and white wire connectors separated if you can. Replace the cover onto the junction box.
 Feed the light fixture into the ceiling hole by inserting the junction box first. Then press the recessed can up until it is flush with the ceiling.
 Locate the four tabs inside the light fixture. Use the flat screw driver to press the tabs through the light fixture. You may need to bang on the screwdriver with your fist or a hammer to set the tabs to lock against the ceiling.
 Insert light bulb(s), turn on the power, and switch on those beautiful recessed lights!
 I had to share this some-ecard with you that BigMamaCass (an amazing photographer) shared with me on Instagram. I was ready to publish this post and get it out before my email feed went out at 8pm. Then the power flickered and wouldn’t you know that the internet went out! I can’t think of anything more frustrating for a blogger. So, this image she sent brought a good laugh from me.
___________________________________________________________________________________
I had to share this some-ecard with you that BigMamaCass (an amazing photographer) shared with me on Instagram. I was ready to publish this post and get it out before my email feed went out at 8pm. Then the power flickered and wouldn’t you know that the internet went out! I can’t think of anything more frustrating for a blogger. So, this image she sent brought a good laugh from me.
___________________________________________________________________________________
TOP 12 RECESSED LIGHTING PROJECTS
Push the ends of the wires into the wire connector. Put all the wiring back in the box and put on the cover plate. Snap the trim kits on the lights.

Kitchen progress is definitely moving along (hooray!!!) We now have recessed lighting in our ceiling and it really helps even out the lighting in the kitchen. Plus getting rid of the semi-flush light fixtures makes the ceiling feel taller.
We debated about installing new construction recessed lighting:
or remodel type recessed lights:
We could have installed either because our ceiling was already full of holes. Ultimately, we decided to install the old work (or remodeling type) lights because they clamp tightly to the sheet rock for less vibration. They also have a built in junction box with easy to wire connectors. (Did I mention that my son’s bedroom is right over the kitchen and there is a lot of jumping and bouncing that goes on up there!)
My electrician let me pal around and help him install the recessed cans after he ran the wiring. You know I took careful notes so I could share with you how to install your own recessed lighting fixtures.
Materials:
- Remodeling recessed lights
- Light bulbs (be sure to get bulbs rated for your cans or they may blink out when the temperature gets too hot.)
- Wire coat hanger
- Pencil
- Piece of tape
- Hole saw (or drywall saw)
- Wire strippers
- Wire cutters
- Flat screwdriver
- Utility knife
- Hammer (optional)
Instructions:
First determine where you would like your light installed. Hire an electrician to run electricity though your ceiling if there aren’t already wires accessible. Remove the paper template from the recessed can. Trace onto the ceiling with pencil.
My electrician showed me how to make this cool tool out of a coat hanger to determine if there are any obstructions in the ceiling.
First bend the wire to the radius of the paper template (from the center to the exterior edge.) Next place the coat hanger against the side of the can. Extend the bent end an inch or so above the can and then wrap a piece of tape around the hanger where it meets the bottom of the recessed light (shown by the red line.) Here is what the tool looks like when you are done:
Press the bent end up into the center of your traced circle. Then press the hanger up into the ceiling until you reach the tape. Spin the wire around. If it doesn’t hit anything you have the clearance you need to install the recessed light. If you hit something, you’ll need to relocate the light to another location.
Cut around the pencil line into your ceiling using a drywall saw. Or you can use this fancy hole cutter my electrician uses. It attaches to the drill and has a spinning blade that cuts the hole. The bowl around the blade catches all the drywall mess. Genius!
Pull the wires that the electrician ran through the hole.
Grab one of the recessed light fixtures. Remove the cover from the junction box. Use the flat screwdriver to break off the slot(s) in the side of the junction box. You’ll only need to break off one tab per wire. (If you have two wires, the fixture is in a daisy chain and electricity runs to another fixture from that one. In that case, break off two slots.)
Feed the wire(s) through the slot(s) in the side of the junction box. Pull them through about 6 – 8″ to give you enough room to work with.
Gently score the plastic coating of the wires. Then cut off the plastic coating and the paper coating from the wires. Finally strip off about 3/4 of an inch from the end of the black and white wires.
Spread out the wires in the box and locate the ones attached to the light fixture.
Here comes the easy part! Attach the newly stripped wire to the same colored wire from the junction box by firmly inserting the wire into the wire connector. [White connects to white; Black to black; and bare to bare (or green).] Gently tug on the wires to make sure they won’t slip loose from the connector.

Gently fold the wires back into the junction box, take care to keep the black and white wire connectors separated if you can. Replace the cover onto the junction box.
Feed the light fixture into the ceiling hole by inserting the junction box first. Then press the recessed can up until it is flush with the ceiling.
Locate the four tabs inside the light fixture. Use the flat screw driver to press the tabs through the light fixture. You may need to bang on the screwdriver with your fist or a hammer to set the tabs to lock against the ceiling.
Insert light bulb(s), turn on the power, and switch on those beautiful recessed lights!

I had to share this some-ecard with you that BigMamaCass (an amazing photographer) shared with me on Instagram. I was ready to publish this post and get it out before my email feed went out at 8pm. Then the power flickered and wouldn’t you know that the internet went out! I can’t think of anything more frustrating for a blogger. So, this image she sent brought a good laugh from me.
___________________________________________________________________________________
TOP 12 RECESSED LIGHTING PROJECTS
1. Bamboo Blowout (04:43)
-
 After four years and seven contractors, this kitchen is ready for a redo.
- After four years and seven contractors, this kitchen is ready for a redo.
2. Recessed Lighting (01:13)
-
 New lighting can give your bathroom the biggest bang for the buck.
- New lighting can give your bathroom the biggest bang for the buck.
3. Can Cap (01:08)
-
 This cover for recessed lighting cans protects against paint overspray.
- This cover for recessed lighting cans protects against paint overspray.
4. Hidden Light Sources (01:57)
-
 Hidden sources are appealing, and recessed lighting goes with any decor.
- Hidden sources are appealing, and recessed lighting goes with any decor.
5. How to Install Recessed Lighting in the Kitchen
-
 Host Paul Ryan helps a homeowner install clever recessed lights in her kitchen.
- Time:
-
Day
- Cost:
-
$250 - $500
- Difficulty:
-
Moderate to Hard
- Host Paul Ryan helps a homeowner install clever recessed lights in her kitchen.
- Time:
- Day
- Cost:
- $250 - $500
- Difficulty:
- Moderate to Hard
6. 10 Things You Must Know: Accent Lighting
7. Almost a Deal-Breaker (04:32)
-
 The kitchen in this house was almost a deal-breaker to the buyers.
- The kitchen in this house was almost a deal-breaker to the buyers.
8. Install a Recessed Canister Ceiling Light
-
 Add light to a room with an easy-to-install recessed ceiling light.
- Time:
-
Under Half Day
- Cost:
-
$1 - $50
- Difficulty:
-
Moderate
- Add light to a room with an easy-to-install recessed ceiling light.
- Time:
- Under Half Day
- Cost:
- $1 - $50
- Difficulty:
- Moderate
9. How to Wire Recessed Ceiling Lights
-
 Recessed "high hat" lighting fixtures provide excellent illumination and give a room an elegant appearance.
- Time:
-
Weekend
- Cost:
-
$250 - $500
- Difficulty:
-
Moderate
- Recessed "high hat" lighting fixtures provide excellent illumination and give a room an elegant appearance.
- Time:
- Weekend
- Cost:
- $250 - $500
- Difficulty:
- Moderate
10. Kitchen With Chimney Design (00:04:43)
-
 A puzzling chimney in the center of the kitchen gets a needed facelift.
- A puzzling chimney in the center of the kitchen gets a needed facelift.
11. Install Recessed Lighting (05:32)
-
 Host Paul Ryan gives a tutorial in installing recessed lighting.
- Host Paul Ryan gives a tutorial in installing recessed lighting.
Hey, Dear
ReplyDeleteYour blog is awesome.
I loved and enjoyed to reading this blog
Thanks
6 Inch LED Pot Lights
http://aqualityassurance.water.blog/2020/05/11/how-to-choose-recessed-lights/
ReplyDeleteBest RECESSED DOWNLIGHTS in UK
ReplyDeleteContinue to post articles like these. Thank you very much. downlight twins
ReplyDelete